Disclaimer: This post is written from the perspective of a Drupal 8 site that is setup using composer and hosted on Pantheon. The terminal commands shown in this post assume you have a similar setup, but even if you don’t it is likely the steps you need to perform for your site will be very similar.
Modules & Tools
- config_split – Drupal module that allows you to setup parts of your site configration to be “split” off into their own bucket of settings, independent from other “split”s. This module depends on the config_filter module.
- drush – One of Drupal’s command line utilities.
- terminus – Pantheon’s command line utility. This will allow you to run drush commands on Pantheon.
If you are unfamiliar with Terminus, take a moment to review my post of Using Drush and Terminus on Pantheon.
Configuration Management
If you are unfamiliar with Drupal 8’s configuration management system, I highly recommend checking out Mike Anello’s Configuration Management presentation. He has a ton of experience teaching and training Drupal 8 developers and has recently been putting a lot of work into demystifying configuration management.
In general, the main things to know about config management are:
- Configuration files are settings (not content) for your website that can be exported to your code base.
- Configuration files are YAML.
- You will store them in your Drupal site git repo.
- After you make a change to an environment, you will “export” the changes from the database, thus modifying your existing YAML configration files in your repo.
- When you want to apply the new configuration changes to an environment, you will “import” those files into the Drupal environment’s database.
The most common deployment workflow is going to look like this:
- Make some changes on your local development environment.
- Export your configuration to code.
- Commit the changes to your git repo and push them to another site environment.
- Import your configuration changes into the other site environment.
And you’ll repeat this process each time you have a new set of changes to deploy.
Setup your configuration directory
The first thing we need to do is make sure Drupal knows about a directory in your repo where it can sync its configuration to and from. By default, Drupal 8 will set this target directory to sites/default/config, but ideally this folder is somewhere outside of the Drupal webroot. With a composer based setup, this is fairly straight forward to accomplish because the Drupal webroot tends to be a subfolder within your repo already.
To setup your project’s default configuration folder outside of the Drupal webroot, modify your settings.php file. Since this is a Pantheon hosted site, you should find a line that includes Pantheon’s additional settings file. Then we will place some code beneath that file inclusion to modify where Drupal will look for the site’s configuration files so that it looks “one folder above the webroot, in the config/sync directory”.
Note: The code added is the $config_directories array. The inclusion of settings.pantheon.php is shown above to indicate where the new array should be placed within the file.
My First Configuration Management – Export & Import
Now that we’ve told Drupal where to store configuration files, we’re ready to manage our configuration! Let’s go through the entire workflow once to get a sense of the whole process.
- First, we’re going to export all of our site’s current configuration using Drush. In your terminal window, make sure you are within the Drupal repo somewhere and run the following command, answering “yes” to any prompts:
drush config:export
- Second, we’re going to commit our configuration to our git repo. In our case the git repo is hosted by Pantheon and pushing to the master branch will automatically apply those changes to the “dev” environment for our site:
git add .
git commit -m "my first config export"
git push origin master
- Third, using terminus we’re going to import our configuration into the site “dev” environment, answering “yes” to any prompts:
terminus remote:drush mysite.dev -- config:import
Voila! You should have successfully synced your developmenet environment’s configuration with your local Drupal environment. If you’re happy with the results and want to go ahead and import your changes all the way up the chain, then you’ll need to deploy your changes through to both the “test” and “live” environments, and import your configuration to both of those environments along the way.
- Deploy repo changes from the “dev” environment to the “test” environment:
terminus env:deploy mysite.test
- Import configuration from the file system to the “test” environment Drupal database:
terminus remote:drush mysite.test -- config:import
- Deploy repo changes from the “test” environment to “live” environment:
terminus env:deploy mysite.live
- Import configuration from the file system to the “live” environment Drupal database:
terminus remote:drush mysite.live config:import
Now check your live site for changes — ? We did it!
Config Split
As mentioned previously in this post the Config Split module solves the problem of, “what do I do if I want to have configuration differences between environments”? A common example of this problem becomes obvious when we think about developer modules such as devel, stage_file_proxy, reroute_email, or any other similar module that you’d never want to accidentally have enabled on your live website. Config Split solves this problem by allowing you to create groups of Drupal configurations that are treated differently from the rest of the configuration. These special groups of configuration are called “splits”.
The main point to take with us on our config split journey is this:
Config Split is used to enable modules and change settings throughout your environments.
This point is why we deployed our first config export with very little enabled in configuration besides the site basics. Next, we’ll use config split to enable modules and change settings for specific environments.
Don’t think about config split as a way to conditionally disable modules, or you’re going to have a bad time.
Config Split Drush Commands
The drush commands for config split are very similar to the normal configuration management commands. The most notable difference is that we’ll need to specify a split’s name each time we use the command. More on split names in the next section.
Exporting a config split:
drush config-split:export <split name>
drush csex <split name>
Importing a config split:
drush config-split:import <split name>
drush csim <split name>
Note: When importing a config split, not only are the split-specific configurations imported, but the shared (primary) site configuration is imported as well.
Planning our Config Splits
To get started we’ll install Config Split and its dependencies, and then setup our site to have 2 splits. We’ll call one “live”, for settings that are only needed on the live website, and the other we’ll call “dev”, for every environment that is not the live website.
The plan for the “dev” split will be simple:
- Enable the following modules: Devel and Devel Kint
- Disable Drupal’s performance settings: CSS & JS Aggregation
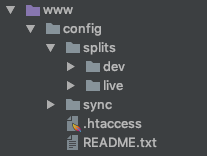
- We’ll store this split’s configuration files within the ../config/splits/dev directory (relative to the Drupal webroot).
And the plan for the “live” split will essentially be the opposite:
- Disable the following modules: Devel and Devel Kint
- Enable Drupal’s performance settings: CSS & JS Aggregation
- We’ll store this split’s configuration files within the ../config/splits/live directory (relative to the Drupal webroot).
Before using Config Split, we need to create the two new directories where we will store the configuration specific to these two splits. These two folders will be siblings to the config/sync folder we setup earlier as our main configuration folder.
Now we’re ready to setup our new Config Splits.
Install and Setup Config Split
First thing we need to do is install config_filter and config_split on your local environment. If your site is setup to use composer, you can run the following commands to automatically get both modules and enable them:
composer require drupal/config_split
drush en config_split
Next, we want to setup 2 splits; one for development (we’ll call it “dev”) and another for the live site (we’ll call this one “live”).
Create the “Dev” Split
- Download and enable the Devel and Devel Kint modules:
composer require drupal/devel
drush en devel kint
- Visit Config Split’s configuration page at the following url and click the “Add Configuration Split Setting” button:
/admin/config/development/configuration/config-split - Provide the following values:
- Label: Dev
- Description: Development environment specific configuration.
- Folder: ../config/splits/dev
- Active: unchecked (more about this later)
- Complete Split: Select the following “Modules”:
- Devel
- Devel Kint
- Click “Save”
Create the “Live” Split
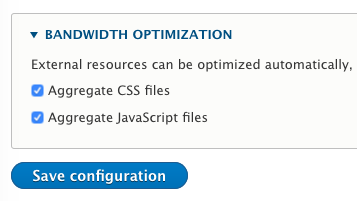
- Turn on CSS & JS Aggregation settings in the performance area:
/admin/config/development/performance
- Visit Config Split’s configuration page at the following url and click the “Add Configuration Split Setting” button:
/admin/config/development/configuration/config-split - Provide the following values:
- Label: Live
- Description: Live environment specific configuration.
- Folder: ../config/splits/live
- Active: unchecked
- Complete Split: Select the following “Configuration items”:
- system.performance
- Click “Save”
Now that our splits are setup, we’re ready to update our global configuration, and create our split specific configurations!
Exporting our Split Configurations
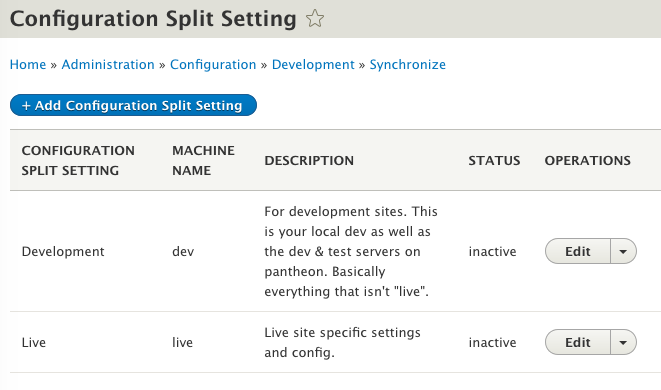
Your Config Splits list should now look something like this:
Now we need to export these splits, as well as each split’s special unique configurations. We’re going to do the following things:
- Export all configurations using the normal config:export command
drush config:export
- Export the “dev” split configurations using the config-split:export command
drush config-split:export dev
- Export the “live” split configuration using the config-splut:export command
drush config-split:export live
- Review and commit all of our new configurations to the git repo.
git add . && git commit -m "config_split settings"
Now let’s take a look at the config management directories to see what was done:

Let’s go ahead and push these changes and deploy them throughout the environments. This step won’t actually be using the config splits yet because we don’t have any of them enabled, it will just enable the Config Split module and import our splits’ settings to all of our environments.
(Note: You’ll need to take a moment between each of these commands to allow Pantheon to have time to complete the tasks.)
# deploy code to the dev site and import the config
git push origin master
terminus remote:drush mysite.dev -- config:import
# deploy code to the test site and import the config
terminus env:deploy mysite.test
terminus remote:drush mysite.test -- config:import
# deploy code to the live site and import the config
terminus env:deploy mysite.live
terminus remote:drush mysite.live -- config:import
Each environment should have the same configuration at this point, giving us a solid baseline before we start configuration splitting.
Enable Splits by Pantheon Environment
Next up, let’s modify our settings.php file to dynamically enable our splits based on the current Pantheon environment. We’ll put our dynamic code somewhere in the file after the line that includes settings.pantheon.php.
This works by relying on the environment variable $_ENV['PANTHEON_ENVIRONMENT']. If this variable exist and has the value of "live", then we will enable our Live split, otherwise enable the Dev split.
Note that you could use this trick to enable or disable more splits based on more (or different) conditions. The take-away here is that we let the actual hosting environment decide which splits are enabled, we never enable them by setting them as active in the Config Split UI.
Let’s commit this change and deploy it to all our environments.
git add .
git commit -m "settings changes to support splits per environment"
git push origin master
terminus env:deploy mysite.test
terminus env:deploy mysite.live
Now if we look at the Config Split module’s interface in our various environments, we should see that the appropriate split is enabled for each one.
-
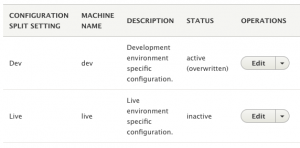
“Dev” split is enabled in the dev environment -
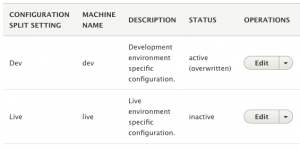
“Dev” split is enabled in the test environment. -

“Live” split is enabled in the live environment.
Perfect. All the setup and hard work is now complete and we are now ready to deploy our split differences to each environment. ?
Split Deployments to Pantheon
Ready for this? We’re about to let our splits decide what modules should enabled and what settings should be changed on each environment.
terminus remote:drush mysite.dev -- config:import
terminus remote:drush mysite.test -- config:import
terminus remote:drush mysite.live -- config:import
That’s it! Now that our splits are enabled appropriately and dynamically based on the actual hosting environment, the normal Drush configuration import command will sync both the primary configuration and the enabled splits automatically.
To check our work, we just need to ensure these few things:
- On the Dev and Test sites:
- Devel and Devel Kint modules should be enabled
- Performance settings for CSS & JS aggregation should be disabled
- On the Live site:
- Devel and Devel Kint modules should be disabled
- Performance settings for CSS & JS aggregation should be enabled
Conclusion
Hopefully at this point you understand the value of the Config Split module, and how you can use it to make managing your site across multiple environments much easier. It took me a good bit of research and practice to get to this level of understanding and comfort with the setup and use of the Config Split module, but now that I’ve done it a few times I am super excited to have this tool in my belt.
Takeaways
- Config Splits are never enabled through the UI, they are enabled dynamically within your settings.php file.
- The primary configuration of your site should default towards your site’s optional and development modules being disabled. Then you use splits to enable those modules or change settings values.
- You’ll basically never use the Config Split module’s drush command for importing a split (
config-split:import) because the coreconfig:importcommand will automatically import the configuration for any enabled split.
Discussion
Hey Jonathan, I really have to thank you, it was a super useful article. Pretty good self-explanatory!
Just started using config split (I know…) and getting my head wrapped around the concepts. This post helps a lot.
Hi, thanks a million, the article was very helpful. One question: you write that, once a split is enabled, doing `drush config:import` will import the regular config and that split. However, that does not seem to work when the split-state setting is `active (overwritten)`, which is what your screenshots show, and which is what happens when you set the split-state in settings.php (as per your tutorial). I this case I get:
“`
# ./vendor/drush/drush/drush config:import
[notice] There are no changes to import.
“`
Only after I explicitly activate the split-state in the UI am I able to successfully import the split via `config:import`:
“`
# ./vendor/drush/drush/drush config:import
+————+——————————–+———–+
| Collection | Config | Operation |
+————+——————————–+———–+
| | data_tunnel.admin_settings | Update |
| | system.performance | Update |
| | config_split.config_split.live | Update |
+————+——————————–+———–+
Import the listed configuration changes? (yes/no) [yes]:
> yes
[notice] Konfiguration wird synchronisiert: update data_tunnel.admin_settings.
[notice] Konfiguration wird synchronisiert: update system.performance.
[notice] Konfiguration wird synchronisiert: update config_split.config_split.live.
[notice] Finalisierung der Konfigurationssynchronisierung.
[success] The configuration was imported successfully.
“`
Am I missing something?