Today a contributor to one of my WordPress plugins asked if I would make the plugin available on packagist. I’ve always been curious what it takes to do this, so I took some time to figure it out.
If you’re unfamiliar with Packagist, it is a repository composer commonly uses to include other libraries and projects within your project. If you’ve used composer to manage a project, you’ve likely used packages from packagist.org.
Requirements
There area few requirements for adding a package to packagist:
- Our project needs to have a publically available git repo. This can be on GitHub, BitBucket, or most similar services that host public git repos.
- We need a
composer.jsonfile within our project. This will file will describe our plugin to packagist. - And a packagist.org account. This is free if you intend to make your packages available to the public.
As far as the first item goes, you can decide which publically available git repo service is best for you. I use GitHub for a lot of projects, so this tutorial will focus on GitHub for its examples.
composer.json
The only change we need to make to the project itself is to create a new composer.json file within the root directory of the project. This file will provide packagist with important metadata that describes our project. As an example, here is the file I created for my project.
Let’s look at some of the important properties here:
- name – The project name including personal namespace. The format for this value should be “namespace/project-name”. All lowercase, with no spaces or punctuation besides dashes.
- type – The type of project this package is. In our case “wordpress-plugin” will inform the composer installer how to handle our package.
- license – The license this project is released under. Since our project is a WordPress plugin, this needs to be a GPL compatible license. For a full list of valid license codes, see the SPDX license list.
- require: { “composer/installers”: “~1.0” } – It is important to require the composer/installers project as a dependency if you want to use certain “type” values. In this example, the “type” “wordpress-plugin” is provided by the
composer/installerproject. Without that requirement composer would not know where to place the plugin correctly during installation. The Readme file for the installers project provides a long list of various custom “type”s it makes available to composer – https://github.com/composer/installers.
The remainder of the properties listed here will set the project’s dependencies or otherwise help developers find and participate in your project. For full details properties and valid values in composer.json, take a look at the composer documentation for its schema – https://getcomposer.org/doc/04-schema.md
Once you have a composer.json file in place within your public repo, you’re ready to continue.
Packagist.org
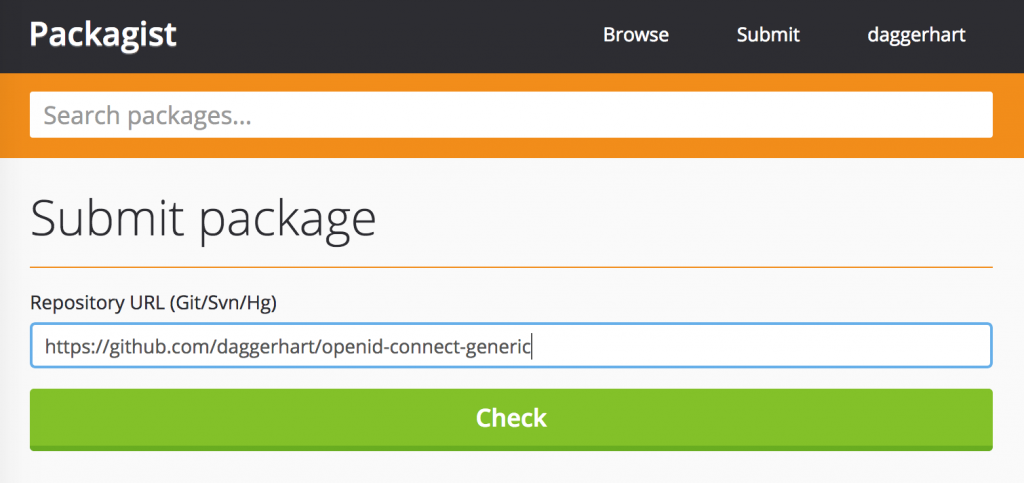
Next, head over to packagist.org and create an account if you do not have one. Once logged in you should see a “Submit” button at the top of the page that will take you to a very simple form.
Copy the URL to your public repo and paste it in the provided field and click “Check” to have packagist begin gathering data on your project.
Once Packagist validates the project’s composer.json file, we should be ready to go! You can test it out by using composer.
Testing with Composer
Create a folder somewhere on your system. Within that folder type composer init. Since this is just a test, you can just press ENTER to provide the default values for all the questions.
After composer has initialized a project, require your new package for that project and you should see composer download and place it within the appropriate directory. In the case of a “wordpress-plugin”, it should download our project within the wp-content/plugins folder.
composer require daggerhart/openid-connect-generic
Setup Packagist Automatic Updates
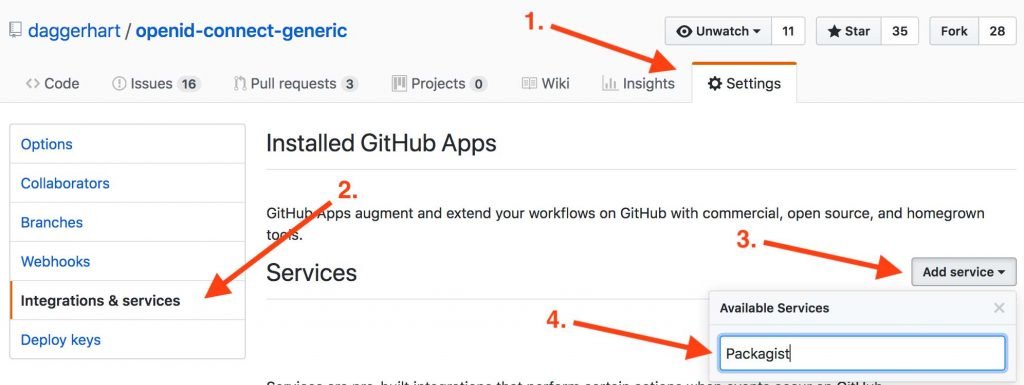
The last step we want to do is setup our repo to notify packagist when there are updates. Note that different git services may require slightly different steps for this process. For GitHub, you’ll want to edit your project settings and add a “Service”.
- Go to your GitHub repository
- Click the “Settings” button
- Click “Integrations & services”
- Add a “Packagist” service.
- Provide your Packagist username and API token.
- Check the “Active” box and submit the form.
Once you have created the service integration you’ll be able to test it by clicking the “Edit” button beside the serivce, and then the “Test service” button inear the top of the page.
For more information on setting up integration with various repo providers, see the packagist documentation on the subject here – https://packagist.org/about#how-to-update-packages
Conclusion
Your project should now be setup and ready to be used by composer! Overall I was very happy with how easy the whole process was. Most of the time it took me to create my first package was spent fixing some trailing commas in the composer.json file and deciding on the name for my project.
If you have any suggestions for improvements to my composer.json file, or run into any problems with this tutorial, please let me know in the comments. Thanks!
Resources
- composer.json Schema – https://getcomposer.org/doc/04-schema.md
- SPDX License List – https://spdx.org/licenses/
- Composer Installers project for common package “type”s – https://github.com/composer/installers
- Packagist Documentation – https://packagist.org/about
Discussion